Natural Dye Ukrainian Easter Eggs
Make stunning Natural Dye Ukrainian Easter Eggs imprinted with herbs and all-natural colors for your Easter meals.
Equipment
- 2 Pots Small and Large
- Slotted Spoon
- Strainer
- Bowl
- Cheese Cloth Cut into squares
- Thread
- Scissors
Ingredients
- 12-18 Eggs - Room temperature
- 8 Yellow Onions - Peels only
- 4 Cups Blueberries - Frozen or fresh
- 4 Quarts Water - Divided
- Herbs - I used mainly cilantro and chamomile leafs
- Olive Oil - Optional, to shine the eggs
Instructions
For the Onion Skin Dye:
- Collect the dry, papery outer skins from yellow onions. You'll need enough onion skins to fill a pot with water.
- Rinse the onion skins to remove any dirt or debris.
- In a large pot, add the onion skins and enough water to cover them completely, at least 2 quarts (the amount of water will reduce as it simmers).
- Bring the water to a boil, then reduce the heat and simmer for about 30 minutes. The longer the onion skins simmer, the deeper the color of the dye will be.
- Allow the onion skin dye mixture to cool. Optionally, strain out the onion skins in a colander into a smaller pot, leaving behind the liquid dye.
For the Blueberry Dye:
- Thaw the blueberries at room temperature, if using frozen.
- In a large pot, add the thawed blueberries and 2 quarts of water.
- Bring the water to a boil, then reduce the heat and simmer for about 30 minutes. Mash the blueberries occasionally to release more color.
- Allow the blueberry dye mixture to cool. Once cooled, strain out the blueberry solids using a fine-mesh sieve or colander, into a smaller pot, leaving behind the liquid dye.
For the Eggs:
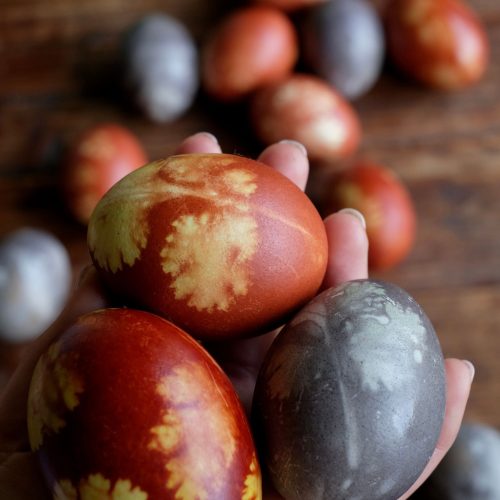
- While the dyes are simmering, prepare the eggs. Soak the herbs in a little water to help it adhere to the egg. Gently apply the herbs to the egg, making sure it sticks to the shell.
- Tightly wrap a piece of cheesecloth around the egg, careful that all the herbs stay in place. Twist the cheesecloth tightly at the bottom and tie a knot of thread around it. Make sure everything is tightly secured for the best results.
- Cut off the excess cheesecloth right above where you tied the knot. Repeat the process with all the eggs.
- Once the dyes are cooled, gently lower half the eggs into the onion skin dye and the other half of the eggs into the blueberry dye. The eggs should be fully submerged in a single layer, and if they're not, use a smaller pot.
- Bring the dye mixtures to a boil and then reduce heat to a gentle boil. Now set your timer for 10-12 minutes.
- When your timer is up, gently take out the eggs with a slotted spoon and set them on a cooling rack or paper towels.
- Cool the eggs for five minutes, then peel off the cheesecloth and herbs, while the eggs are still warm (otherwise the herbs will dry onto the egg and it will be harder to peel off).
- Optionally, shine the eggs with a little olive oil to make their color stand out even more.
Notes
*There's typically extra onion skins laying at the bottom of the onion bin at the grocery store.
**Make sure the eggs are at room temperature and the dye mixture has cooled to prevent cracking the eggs.
***Beware, the dye could stain whatever pots or equipment you are using (and your hands).